Defeating NAT with reverse SSH proxies
Mon, 07 July 2014 :: #linux
Having a public IP is not as popular as 10 years ago. In earlier days the user could pay extra cash for this useful service, but now it's often an option that is simply not for sale. Is it possible to access your home network, when this network sits behind countless NAT layers?
Short answer is yes, but you need to control an external server with public IP capability, preferably with a fast network connection. You could use some kind of a personal VPS, which are not as expensive as they were few years ago.
Let's assume that you have a remote host R, a home network H, and a computer at work W, from which you'd like to connect to the home network H, to start the download of latest episode of Game of Thrones, so it'll be ready when you'll get home. ;) Of course I'm assuming that H and R are running Linux (or a different, a posix-ly unix-ish, variant). On Windows you may get away with downloading some binaries like ssh.exe, but I haven't got a chance of testing this approach.
Theory
The plan is:
Running the
sshcommand fromH, that connects toR, to port22, specifying the remote proxy port19500(it's an arbitrary number, choose another if you'd like).Then, with this connection active, you can connect from
WtoRto port19500.sshon theRwill forward any packet sent to port19500toHautomatically.
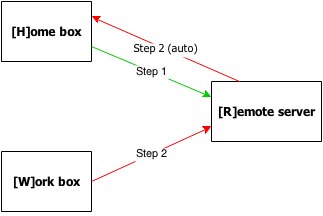
This will result in having a connection initiated by W to the home network H, with R machine serving as a proxy. It may be not what you want if you want to play games, but for remote administation it works OK.
Practice
For example purposes, let's use a host with the name yourproxy.externalvps.com, which uses port 19500.
They say that the commandline is worth a thousand images, so:
# STEP 1
[H]OME home $ ssh -R 19500:localhost:22 yourproxy.externalvps.com
[H]OME Enter ssh password: (...)

# STEP 2
[W]ORK work $ ssh yourproxy.externalvps.com
[W]ORK Enter ssh password: (...)
[W]ORK yourproxy $ ssh localhost -p 19500
[W]ORK Enter ssh password: (...)
[W]ORK home $ _
Automatization
You can use public key authentication to disable the password-based protection. First, generate your public key for H machine by using ssh-keygen:
[H]OME $ ssh-keygen -t rsa
[H]OME ...
Then, copy the ~/.ssh/id_rsa.pub file to the R host, and append it to its ~/.ssh/authorized_keys file:
[R]EMOTE $ cat id_rsa-home.pub >> ~/.ssh/authorized_keysWARNING: make sure you're using >>, not >!
You should now be able to perform step 1 without entering the password to yourproxy.externalvps.com. This should suit automated scripts, invoked at system startup, or periodically from your WAN router!
Router setup
Every router is different, but most of them contain the BusyBox binary, along with the dropbear ssh server & client. One thing to note is that dropbear expects the private key to be stored in its private dropbear format, so you need to create the private key by using dropbearkey instead of ssh-keygen:
router $ dropbearkey -t rsa -f id_rsa.dropbear
# dropbearkey -t rsa -f example
Will output 1024 bit rsa secret key to 'id_rsa.dropbear'
Generating key, this may take a while...
Public key portion is:
ssh-rsa AAAAB3NzaC1yc2EAAAADAQABAAAAgwCh2w0Xv/5n7XldpdHo3XQ5VPKZbybsfVUGnYK9uwK294A4Y/R8IzSw8vuwZ+Ld9X+N7eQ7aN2H2Ez/3TYGHMHoCWnEFhNHmsxJ3LQCtsNm9fBOl58YoE4xGnZHQ1Ig3E2ee/j8Xi2tcKdrzE+hKQcoQ0FR2A+HqkUy7Z6TjCd3nIvH
root@router
Fingerprint: md5 be:5f:34:27:a0:4c:9f:20:f9:bc:7b:f1:f9:19:85:d7
You need to append the line below Public key portion is: to the authorized_keys file on the R host. Then, by using this commandline from the router:
ssh -R 19500:localhost:22 -N -i /jffs/id_rsa.dropbear user@yourproxy.externalvps.comyou will be able to create a step 1 reverse proxy connection from your router to the R host.
After creating the connection from W to yourproxy.externalvps.com's port 19500 (but remember, you need to connect to it through localhost), you will connect to your router. From your router, it should be easy to access your box by just ssh'ing on it.
Of course, you can also go even further than that:
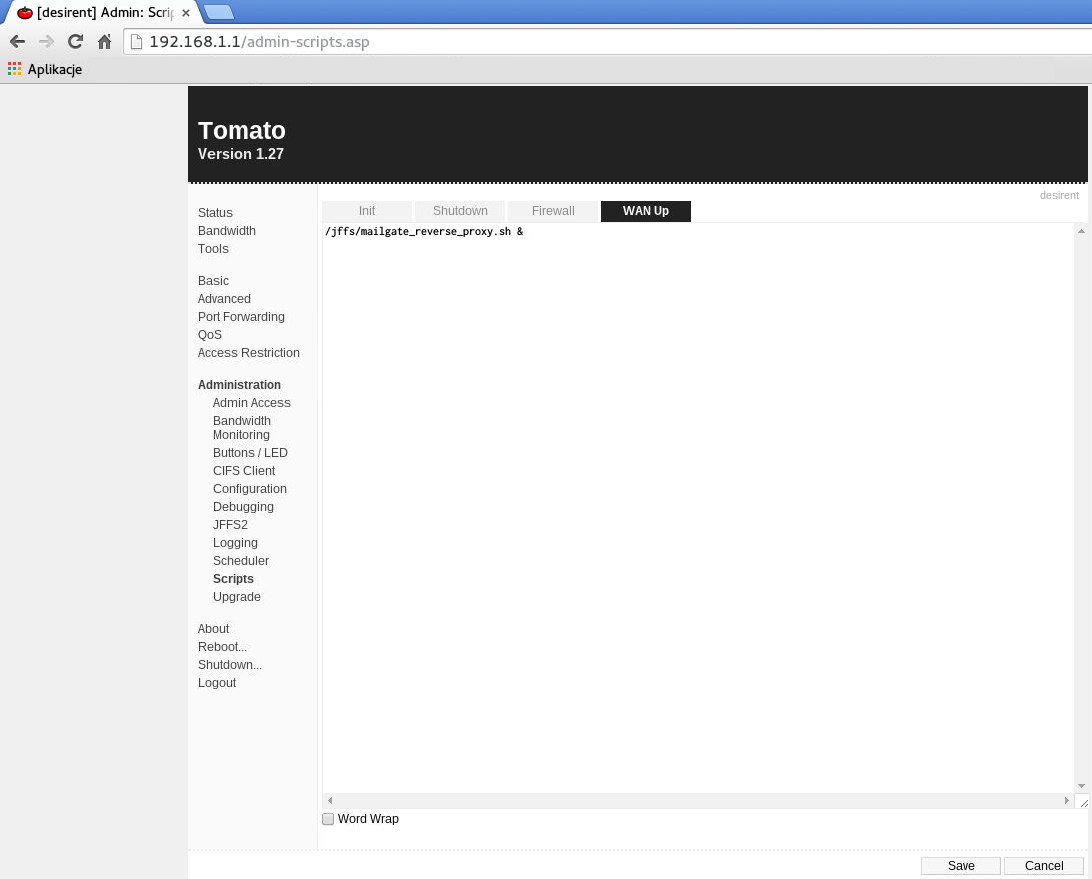
In Tomato firmware, you can create a script that will be executed on startup. /jffs partition can be setup to persist between router restarts, so you can put your scripts there. Consult the documentation if you want to know more about both the /jffs partition and this particular Tomato administration option.
