Enabling USB movie playback on LG 42LD550 TV
The main problem is entering the service menu of the device. Only then it's possible to enable the movie playback. The software which knows how to interpret files with movies is already there, we just need to remove (unlock) the protection - which is possible with the help of the service menu.
The hard part is answering the question on how to enter it ;). Different TV models require different methods: beginning with a special key combination on special remote control (used by support workers), by holding the “menu” key both on the remote control and the physical button on the TV, ending with serial cable communication. Unfortunately, my TV from the 5xx series didn't work at all with any of these methods, so I had to find a different solution.
The TV has its own serial communication port (
RS-232), which is the same port that allows itself to be connected with a PC, or a notebook, which could be lying nearby. Then, by using software like HyperTerminal on Windows, it would be possible to enter some magic commands to enter the service menu. The problem was that I didn't posess any spare serial cables, so the connection wasn't possible ;), and also the time needed to acquire such cable was in contrast with my desire to quickly resolve the issue.Different key combinations on the TV, remote, and both devices at the same time didn't work. They worked for some people on other forums, but not me. Shit happens ;)
Some people discovered a very interesting idea that was based on firmware flashing. First, they did a downgrade of the firmware to a specified version, which didn't have the movie playback protection, and then upgrade the firmware to the newest version. This seemes to clear the memory flags which activate the protection, and indeed this could work, if it wasn't for somewhat invasive spirit of firmware change; I could do it, but I'd rather try everything I can before I've decided to take such radical steps. I've postponed this method to the “last resort”, if everything else fails.
There are some reports that some time ago it was possible to buy a “service remote control” on an online auction site, which literally had a physical button to enter the service menu. This is definately the best option you can get, because it doesn't require hacking of any kind. Problem is, I couldn't find it, and the poor guy from the store didn't know either, and haven't heard anything about this device before; he should learn to use Google :)
If the “service” remote control is out of the question, maybe an “universal” remote control isn't. There are tutorials on the net describing that after doing some reprogramming to LG compatibility mode and by hitting the
SHIFT+-/--button (yes, there is a button on the remote called-/--), the service menu magically appears. The problem with this approach is that I couldn't find any compatible universal remote controls in stores from the neighborhood.Another popular solution was to use a Symbian-based mobile phone (smartphone?) which had a infrared port built in. This could work, because it could be possible to write an application that used this port to emit a specified light sequence, triggering the service menu in the TV. The problem was that I didn't have any Symbian phone at that time (or any phone with infrared port for that matter), so this method was a no-go from the very beginning. But it still was very interesting, and in fact, it gave me another idea, which basically uses the same method.
Building-up my own remote control, which could emit the same flash sequence, as the service remote control/universal remote control does after hitting
SHIFT+-/--.
The “building” part is rather over-advertised, and it's a few times more than I actually did, but giving the fact my english sucks big time, it has to do the job.
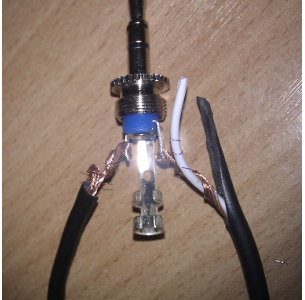
My remote control is built from three things. First one is an infrared diode, capable of emitting infrared light. I borrowed it from an other old remote control for an old Sanyo VCR. After de-soldering, the diode had its legs long enough to connect them to the cable.
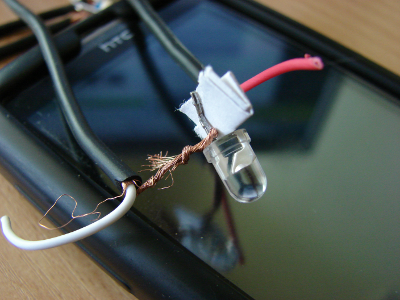
Another thing is a dual-channel cable and a JACK port - both things could be acquired by cutting through an old cable from old earphones that aren't used anymore, and by taking the part with the plug ;).
Third part, the most important one, is a laptop with a working earphone port. A smartphone with such port also will work. By writing “earphone port” I'm thinking about a standard JACK port, not mini-jack, not a “bigger jack”, just a standard, the most popular jack port which you can find in the back plate of your average PC. Not every smartphone has a port like that, but it doesn't have to be a smartphone; it can be any device with such port, which is capable of playing music. It can be even your new iPod or an old Walkman :)
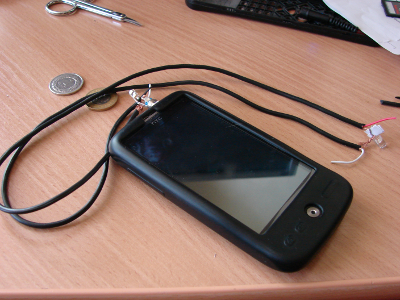
Here's my “remote control”, along with the smartphone:
By connecting the remote control to the device, and by playing a specified audio file on the device, we create a situation, where the diode will emit sequences of light in the par with the audio file structure. So it happens that I've found some specially crafted audio files, that could be used to instruct the diode to emit a specified sequence, which will be understandable by the TV. Then, the TV will open up the service menu, because it'll see a familiar flashing sequence.

After putting it all together, you just need to put the diode very closely to the IR receiver port on the TV (because the diode signal will be too weak to be noticeable from distance), and play this audio file (serv-ok-ok.mp3). If it won't work, then you may want to flip the diode and try again. The TV should answer by asking for the password: which should be either 0413 for this model, but you can also try 0000 if it won't work. After that, in the Tool Menu number 3, you'll have the DIVX option, which sould be set to 1. Remember not to touch other options. There are lots of reports on the net from people, who felt brave and decided to “tweak” as much options as possible. This resulted in the loss of sound, or completely brick the TV, rendering it useless in terms of entertainment. Changing the DIVX option from 0 to 1 should be safe - in this model ;).
After exiting the menu with the EXIT button, you can test the movie playback capability without restarting the TV, by plugging in a pendrive, or a mobile hard disk, into TV's USB port. I've checked a 500gb hard disk, and it worked without problems; same thing with 1TB drive.
I'm also going to show a short video, which will demonstrate how to enter the menu, and flip the relevant option from 0 to 1. On this video the option will already be 1, because I've did it before ;). Another thing is that after first test the TV reported an error -- I was using a memory card and an adapter. The card wasn't fully inside the adapter, so the communication apparetly lost a few bytes and the TV didn't know how to interpret this corrupted transmission, but after I fixed that, the communication worked, and as you can see, the movile playback worked as well.
Also, good thing to know is that this model doesn't support the DTS audio, as well as some video formats, but it should handle a standard XviD or h.264 video file, although not sure if Matroshka (.mkv) format is supported. This is a place for your trials, errors and experimentation with ffmpeg.
(the movie is slightly cropped at the top, because the stabilization function of the camera wanted to be too inteligent).
This method should also work on the 32LD550 models, although I haven't tried it personally. Good luck!
