Usage of encrypted file containers
Lots of modern systems (Linux, BSDs) support encryption of block devices, or file containers, in a similar way that TrueCrypt does it. It is basically (more or less) a built-in TrueCrypt that gives you the possibility to build a secure medium and store your sensitive files inside.
Device-mapper
There is a subsystem in the Linux kernel called device-mapper. It allows the creation of arbitrary devices that are controlled by software applications. This means that if device-mapper creates a file, its content is being served by another program, not the filesystem module like it's done with conventional files.
This, in turn, means that device-mapper allows to create "dynamic" files (these are actually 'devices', but on Linux there's not a big functional difference between those two). The content of these files are being generated during a read request. It's a very handy mechanism for on-demand file decryption: if a program tries to read an encrypted file, the software driver that controls this file's contents (via device-mapper) reads the encrypted content from the disk, decrypts it, and serves decrypted data to requesting application. No plaintext is ever written to the disk.
Device-mapper stacking
One of the nicest features of device-mapper is the ability to stack with itself. Consider this example:
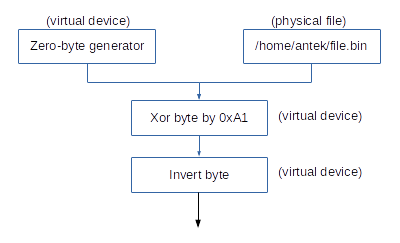
In theory, it's possible to create a device-mapper device (so: a 'virtual device') that will generate unlimited amount of NULL bytes on read request -- in similar fashion that it is done with the /dev/null device.
It is also possible to create another device, an 'xor virtual device' that reads data from its input file, XORs them with 0xA1, and emits the output. This is different from /dev/null, because in this case the device needs another device to be able to read data from it, perform some manipulation, and output altered data.
The example also depicts a third example, 'invert byte virtual device', that works similarily to 'xor virtual device', but instead of XORing each byte, it inverts it.
All of these devices can be stacked one on another. In our example we can read data from 'invert byte virtual device'. This will put in motion several other devices as well:
- 'invert byte device' will ask 'xor device' for data,
- 'xor device' will ask 'zero-byte device' for data,
- 'zero-byte device' will generate a NULL byte, and will return it to the caller,
- 'xor device' will acquire this NULL byte, and it will perform an XOR
0xA1operation on it. Then, it will return the XORed data to the 'invert byte device'. - 'invert byte device' will get the XORed data, and will invert each byte of it.
The result of this operation will probably be next to useless, but it demonstrates the stacking capability of device-mapper. If we switch the zero-byte generator to a normal file, we suddenly have a poor-man encryption system, based on XOR and NEG! ;)
Cryptsetup
Our system of choice is LUKS, without any particular reason other than because it supports a wide range of secure encryption algorithms. Before using it, please be aware that one thing that LUKS doesn't implement is support for plausible deniability -- LUKS actually inserts its header into the encrypted file, so everyone can see that this is an encrypted container.
This shouldn't be a problem in sensitive scenarios, because we can always add another device-mapper device that will encrypt the LUKS encrypted data, along with its header. That's why the device stacking feature is so useful.
We won't use LUKS directly, because it's designed to be used by the cryptsetup frontend. To properly use LUKS, we have to specify the container (or the "input data"). The device will store its encrypted data inside this container. We can choose to have a simple file as the container, a disk drive, or another device. Let's choose a simple file, container.bin.
Let's create a 100MB file that will be the container:
# dd if=/dev/zero of=container.bin bs=1M count=100
Then, let's create the LUKS structure inside it:
# cryptsetup luksFormat container.bin

WARNING!
========
This will overwrite data on container.bin irrevocably.

Are you sure? (Type uppercase yes): YES
Enter passphrase:
Verify passphrase:

# file container.bin
container.bin: LUKS encrypted file, ver 1 [aes, xts-plain64, sha1] UUID: 02dc91ee-e1d8-4918-bcd4-7536f91811a8
It used xts-plain64 as a default encryption algorithm. You can tune up this behavior by command-line settings.
Now we can create a device-mapper device by using luksOpen command:
# cryptsetup luksOpen container.bin container
Enter passphrase for container.bin:

# ls -la /dev/mapper/container
lrwxrwxrwx 1 root root 7 09.11.2014 16:36 /dev/mapper/container -> ../dm-2
As you can see, we have our first virtual device, /dev/mapper/container. When we read from this device, LUKS will decrypt the data from container.bin by using the xts-plain64 algorithm, and will feed our request with decrypted data. When we'll write into this device, LUKS will encrypt this data and store it inside container.bin in encrypted form.
Now we can operate on this device as on any other device. We can create a filesystem on it:
# mkfs.ext4 /dev/mapper/container
mke2fs 1.42.12 (29-Aug-2014)
Creating filesystem with 100352 1k blocks and 25168 inodes
Filesystem UUID: ceb14da6-714a-4a53-9739-428bbffa336e
Superblock backups stored on blocks:
    8193, 24577, 40961, 57345, 73729

Allocating group tables: done
Writing inode tables: done
Creating journal (4096 blocks): done
Writing superblocks and filesystem accounting information: done

# mkdir /tmp/x
# mount /dev/mapper/container /tmp/x
# ls -la /tmp/x
total 13
drwxr-xr-x  3 root root  1024 09.11.2014 16:39 ./
drwxrwxrwt 20 root root   560 09.11.2014 16:39 ../
drwx------  2 root root 12288 09.11.2014 16:39 lost+found/
We have created our first encrypted container! We can close it gracefully by unmounting the filesystem and performing a luksClose command:
# umount /tmp/x
# cryptsetup luksClose container
Limitations
This approach has its limitations. We have created a 100MB container file, and then we have created a filesystem on it. Our free space available for use is:
# df -h /tmp/x
Filesystem             Size  Used Avail Use% Mounted on
/dev/mapper/container   91M  1.6M   83M   2% /tmp/x
It's 83MB. What if, in the future, we would like to increase the size of this container?
One option is to simply increase the size of the container.bin container file (after removing all mappings first and performing luksClose). Then, after mounting the filesystem, invoking a filesystem resize operation (for example by using resize2fs if you're using ext4 filesystem, or xfs_growfs if you're on xfs) should be enough.
But there are scenarios that this won't suffice. One such example is when using a Dedicated Host bought in some server room, or a VPS, where you can just add another storage nodes instead of resizing them. You can't make the file larger than the partition used to hold the file.
You can get around this limitation by entering one abstraction above physical limitations. Enter Logical Volume Management!
lvm2: Logical Volume Management
The topic is as large as Pacific Ocean, so we will simply skip most of it, focusing only on our use-case.
We can use lvm to create a new virtual drive (again, with device-mapper) that will use our containers as physical file storage. This way, by having multiple container files, each with its own file size, we can create a device that will be as large as the sum of each container's length. lvm driver will figure out the best way to dispatch read and write reqests to proper file containers, just like RAID controllers do. One big difference between LVM and RAID is that LVM is more dynamic, and allows you to create, modify, resize and deactivate logical volumes when the system is on-line and working. It actually also supports performing filesystem snapshots, but this is one feature we won't actually use.
So, the layout of our system will look something like this:
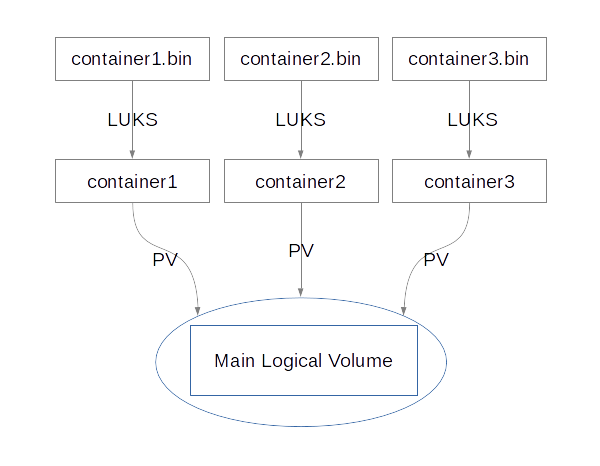
The 'Main Logical Volume' will be our virtual drive, which will contain a filesystem. By using this layout, we will be able to increase the size of it simply by adding more container files. Every container will be encrypted by LUKS, so nothing will be stored as plaintext.
The nodes marked as 'PV' are physical volumes, which are described in the next subsection.
To properly create the LVM layout, we need four things:
- A 'logical volume', which will be a mountable device,
- A 'volume group', which will group our logical volumes (we will have only one logical volume, but a group still is needed),
- A 'physical volume', which will specify where exactly is the place for the data to be written,
- An encrypted space for the physical volume -- this was covered in previous sections of this post.
Let's create everything that is needed, going from the end of this list.
LUKS containers
We will create three containers: container1.bin, container2.bin and container3.bin. Each container will have a capacity of 100MB.
$ for i in `seq 1 3`; do dd if=/dev/zero of=container$i.bin bs=1M count=100; done
100+0 records in
100+0 records out
104857600 bytes (105 MB) copied, 0.0443074 s, 2.4 GB/s
100+0 records in
100+0 records out
104857600 bytes (105 MB) copied, 0.0390611 s, 2.7 GB/s
100+0 records in
100+0 records out
104857600 bytes (105 MB) copied, 0.0388189 s, 2.7 GB/s

$ ls -la
total 307212
drwxr-xr-x 2 antek users      4096 Nov 11 12:05 .
drwxr-xr-x 8 antek users      4096 Nov 11 12:05 ..
-rw-r--r-- 1 antek users 104857600 Nov 11 12:05 container1.bin
-rw-r--r-- 1 antek users 104857600 Nov 11 12:05 container2.bin
-rw-r--r-- 1 antek users 104857600 Nov 11 12:05 container3.bin
Then, we create three LUKS devices from each container, each with some password (you can choose different password for each container, or one password for everything -- depends on your paranoia level).
$ for i in `seq 1 3`; do cryptsetup luksFormat container$i.bin; done

WARNING!
========
This will overwrite data on container1.bin irrevocably.

Are you sure? (Type uppercase yes): YES
Enter passphrase:
Verify passphrase:

WARNING!
========
This will overwrite data on container2.bin irrevocably.

Are you sure? (Type uppercase yes): YES
Enter passphrase:
Verify passphrase:

WARNING!
========
This will overwrite data on container3.bin irrevocably.

Are you sure? (Type uppercase yes): YES
Enter passphrase:
Verify passphrase:

$ file container*
container1.bin: LUKS encrypted file, ver 1 [aes, xts-plain64, sha1] UUID: 282f487a-b708-42ab-b403-667af624f667
container2.bin: LUKS encrypted file, ver 1 [aes, xts-plain64, sha1] UUID: 2d95d5bd-8528-4fdf-8954-57b3268c20c9
container3.bin: LUKS encrypted file, ver 1 [aes, xts-plain64, sha1] UUID: ffa92cc0-c5e9-45dd-95d0-f33469e09dd1
Then we open all containers to create proper device-mapper devices:
$ sudo su
[root@hydra blogpost]# for i in `seq 1 3`; do cryptsetup luksOpen container$i.bin container$i; done
Enter passphrase for container1.bin:
Enter passphrase for container2.bin:
Enter passphrase for container3.bin:

[root@hydra blogpost]# ls -la /dev/mapper/container*
lrwxrwxrwx 1 root root 7 11.11.2014 12:10 /dev/mapper/container1 -> ../dm-0
lrwxrwxrwx 1 root root 7 11.11.2014 12:10 /dev/mapper/container2 -> ../dm-1
lrwxrwxrwx 1 root root 7 11.11.2014 12:10 /dev/mapper/container3 -> ../dm-2
As you can see, we have created three encrypted devices in /dev/mapper/container*.
Physical Volumes (PV)
Now it's time to create a LVM on the top of it. We will use each /dev/mapper/container* device as a LVM Physical Volume (PV). Let's create those PV's:
[root@hydra blogpost]# pvcreate /dev/mapper/container{1,2,3}
Physical volume "/dev/mapper/container1" successfully created
Physical volume "/dev/mapper/container2" successfully created
Physical volume "/dev/mapper/container3" successfully created
We can verify that LVM registered those PVs properly:
[root@hydra blogpost]# pvscan
PV /dev/mapper/container2         lvm2 [98.00 MiB]
PV /dev/mapper/container1         lvm2 [98.00 MiB]
PV /dev/mapper/container3         lvm2 [98.00 MiB]
Total: 3 [294.00 MiB] / in use: 0 [0   ] / in no VG: 3 [294.00 MiB]
We have about 300MB in all three physical volumes.
Volume Group (VG)
We can now create a Volume Group (VG). Volume group is a pool of physical volumes (PVs). We group PVs together in a VG, to be able to create a virtual Logical Volume (LV), that will be contained inside the VG.
[root@hydra blogpost]# vgcreate example_vg /dev/mapper/container{1,2,3}
Volume group "example_vg" successfully created
Let's verify that everything is in order:
[root@hydra blogpost]# vgscan
Reading all physical volumes.  This may take a while...
Found volume group "example_vg" using metadata type lvm2

[root@hydra blogpost]# vgdisplay example_vg
--- Volume group ---
VG Name               example_vg
System ID
Format                lvm2
Metadata Areas        3
Metadata Sequence No  1
VG Access             read/write
VG Status             resizable
MAX LV                0
Cur LV                0
Open LV               0
Max PV                0
Cur PV                3
Act PV                3
VG Size               288.00 MiB
PE Size               4.00 MiB
Total PE              72
Alloc PE / Size       0 / 0
Free  PE / Size       72 / 288.00 MiB
VG UUID
G2YvoH-YwIn-VB8V-aC92-9XPC-Ykj0-2EYdCR
Logical Volumes (LV)
As you can see, we have 288MB free space in our VG. This means that we can create one LV with the size of 288MB. We can also create 288 LV's, each of size of 1MB, but that won't be very practical. Let's create one LV, using all of available space:
[root@hydra blogpost]# lvcreate example_vg -L 288MB
Logical volume "lvol0" created
Now we have a logical volume lvol0, existing inside a volume group named example_vg, distributed across container*.bin files. Here is our device:
[root@hydra blogpost]# ls -la /dev/mapper/example_vg*
lrwxrwxrwx 1 root root 7 11.11.2014 12:23 /dev/mapper/example_vg-lvol0 -> ../dm-3
As previously, we can create a filesystem on it. Let's try xfs:
[root@hydra blogpost]# mkfs.xfs /dev/mapper/example_vg-lvol0
meta-data=/dev/mapper/example_vg-lvol0 isize=256    agcount=4, agsize=18432 blks
         =                       sectsz=512   attr=2, projid32bit=1
         =                       crc=0        finobt=0
data     =                       bsize=4096   blocks=73728, imaxpct=25
         =                       sunit=0      swidth=0 blks
naming   =version 2              bsize=4096   ascii-ci=0 ftype=0
log      =internal log           bsize=4096   blocks=853, version=2
         =                       sectsz=512   sunit=0 blks, lazy-count=1
realtime =none                   extsz=4096   blocks=0, rtextents=0
We can also mount it:
[root@hydra blogpost]# mkdir /tmp/x
[root@hydra blogpost]# mount /dev/mapper/example_vg-lvol0 /tmp/x
[root@hydra blogpost]# df -h /tmp/x
Filesystem                    Size  Used Avail Use% Mounted on
/dev/mapper/example_vg-lvol0  285M   15M  271M   6% /tmp/x
Now we can put files in /tmp/x, we have 271MB free space!
Resizing
Let's try resizing our virtual filesystem by additional 100MB. Here's what we need to do:
- Unmount it,
- Add a new PV to our VG,
- Resize our LV, increasing its size,
- Resize the filesystem on the LV.
Unmounting is easy:
# unmount /tmp/x
Now let's create a new container file, and initialize a LUKS filter on it:
[root@hydra blogpost]# dd if=/dev/zero of=container4.bin bs=1M count=100
100+0 records in
100+0 records out
104857600 bytes (105 MB) copied, 0.0398605 s, 2.6 GB/s

[root@hydra blogpost]# cryptsetup luksFormat container4.bin

WARNING!
========
This will overwrite data on container4.bin irrevocably.

Are you sure? (Type uppercase yes): YES
Enter passphrase:
Verify passphrase:

[root@hydra blogpost]# cryptsetup luksOpen container4.bin container4
Enter passphrase for container4.bin:
Then let's create a PV in the new container:
[root@hydra blogpost]# pvcreate /dev/mapper/container4
Physical volume "/dev/mapper/container4" successfully created
Then, let's add this PV into the pool of VG's physical volumes, so that our LV can use it. We're performing this by using the vgextend command:
[root@hydra blogpost]# vgextend example_vg /dev/mapper/container4
Volume group "example_vg" successfully extended

[root@hydra blogpost]# vgdisplay example_vg
--- Volume group ---
VG Name               example_vg
System ID
Format                lvm2
Metadata Areas        4
Metadata Sequence No  3
VG Access             read/write
VG Status             resizable
MAX LV                0
Cur LV                1
Open LV               1
Max PV                0
Cur PV                4
Act PV                4
VG Size               384.00 MiB
PE Size               4.00 MiB
Total PE              96
Alloc PE / Size       72 / 288.00 MiB
Free  PE / Size       24 / 96.00 MiB
VG UUID
G2YvoH-YwIn-VB8V-aC92-9XPC-Ykj0-2EYdCR
As you can see in the output of vgdisplay command, our VG has a size of 384MB. 288MB of those are used by our LV. 96MB are free -- this is our fourth container file, created and added just now.
Now we can resize the LV, since we acquired some free space inside our VG. The -l 100%VG specifier describes the new size of the LV -- it means: '100% of current VG', so it simply changes the LV to fill up 100% of its VG. Note that there is no space between the percent character % and VG.
[root@hydra blogpost]# lvextend /dev/example_vg/lvol0 -l 100%VG
Size of logical volume example_vg/lvol0 changed from 288.00 MiB (72 extents) to 384.00 MiB (96 extents).
Logical volume lvol0 successfully resized
So far so good. Now it's time to tell xfs filesystem to make use of new free space.
[root@hydra blogpost]# xfs_growfs /dev/mapper/example_vg-lvol0
meta-data=/dev/mapper/example_vg-lvol0 isize=256    agcount=4, agsize=18432 blks
         =                       sectsz=512   attr=2, projid32bit=1
         =                       crc=0        finobt=0
data     =                       bsize=4096   blocks=73728, imaxpct=25
         =                       sunit=0      swidth=0 blks
naming   =version 2              bsize=4096   ascii-ci=0 ftype=0
log      =internal               bsize=4096   blocks=853, version=2
         =                       sectsz=512   sunit=0 blks, lazy-count=1
realtime =none                   extsz=4096   blocks=0, rtextents=0
data blocks changed from 73728 to 98304
Let's try to mount the xfs volume now, and see its new size:
[root@hydra blogpost]# mount /dev/mapper/example_vg-lvol0 /tmp/x
[root@hydra blogpost]# df -h /tmp/x
Filesystem                    Size  Used Avail Use% Mounted on
/dev/mapper/example_vg-lvol0  381M   20M  362M   6% /tmp/x
We have now 362MB of free space. Our volume has been resized by adding another file into the LVM pool. Our work is done ;).
Please note that xfs doesn't support shrinking the filesystem. So growing it is a one-way trip! There may be other filesystems that support shrinking operation though.
Rebooting the system
How to mount the volume after rebooting the system? On modern Linux distributions LVM should pick up all PVs and VGs that are appearing in the system automatically. So all you need to do is to open LUKS containers:
# cryptsetup luksOpen container{1,2,3,4}
...
After luksOpen'ing them all, you should have /dev/mapper/example_vg-lvol0 already present on your system, ready to be mounted into the mountpoint you've chosen.
